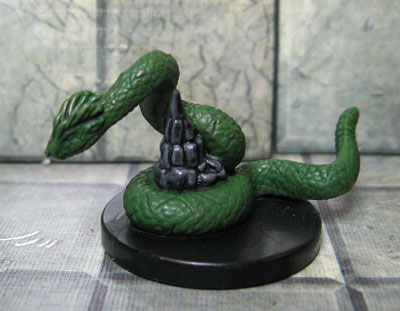
February 2010 Repaint: Deathrattle Viper
Megan Smith, a valued community artist and Chapter Master in Brisbane, Australia, brings us the eleventh in her series of monthly DDM Guild Repaints. Up this month: the Deathrattle Viper from Monster Manual: Savage Encounters.
Explanation and General Instructions
Megan Smith writes:
I really liked getting monthly repainted minis from Organised Play (when we actually managed to get them in Australia) and would like to keep that going for the DDM Guild. However, as we don’t have WotC’s vast resources, or Chinese factory labour, the repaints will be done by each Chapter that wants them. I’d suggest that the Chapter Master ask for volunteers – painting skill is not a requirement, and it should only take about an hour of your time to do 6-10 minis.
It will always be a common mini; the person doing the painting is welcome to use their own spares or to collect a mini from everyone who wants a repaint. You will need to paint enough for everyone in the group to have one, and if you can do a couple of extras to hand out to other people as advertising for the guild (or to give to the shop you play at) that would be great.
Each mini will use 1 or 2 paints (only one of which will be new). I’ll be using (and testing my instructions with) Games Workshop’s Citadel paints because they are very available in most places. If you don’t want to spend the $3.50 or so a month, I would hope that the recipients of the minis would be happy to take turns supplying the paint.
If you already own suitable paints, it’s not a requirement to use exactly what I suggest, but I’d recommend it, as I will have checked that one coat gives the coverage we need and that the wash (if we are using one) goes over it smoothly.
You’ll need a brush—a size 0 round will work for all guild repaints—but if you’d like to be able to do washes faster, get something bigger, like a 2 or 3. Natural hair is generally better than synthetics, but anything that’s relatively soft will work fine.
For the painters out there (and also the non-painters, I suppose), we are aiming for WotC factory quality in the paint jobs, so they are all the same and are fast to do. So, just do the steps outlined (ie. Resist the temptation to paint the eye, or do a quick highlight on the cloak, etc).
I’ll put a thread up in Crafter’s Corner on Hordelings each month, so that if anyone has questions, or needs assistance, s/he can get it. If you don’t have a DDM Guild Chapter near you, feel free to make a repaint for yourself … and while you are at it, make a few extras to give to your FLGS (glue them to Guild flyers).
This Month’s Repaint: Savage Encounters – Deathrattle Viper
Paint needed: Knarloc Green foundation paint, Thraka Green Wash (from Citadel/Games Workshop)
Normal Painting supplies: paintbrush, water for rinsing the brush, paper towel.
Welcome to a new year, and a new set of repaints. (Hopefully you were all as busy as I was last month, and can forgive a slow start to the year). This repaint has an optional last step (for experienced painters only). The mini looks good without it, but I wanted to open up the possibility to save experienced painters from being annoyed at leaving the mini unfinished.
Steps
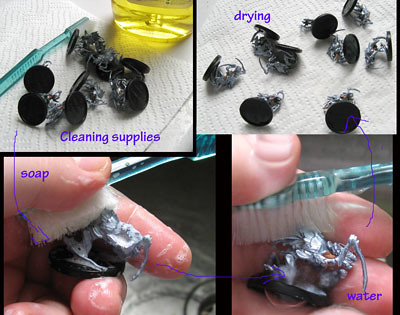
1. Clean your minis
Wash your hands first, then scrub each mini with a toothbrush, using warm water and dishwashing liquid. Then, scrub again with just the warm water to make sure there’s no oil, soap, or anything weird on the surface of the mini. Throw them onto a paper towel a couple of times to knock off most of the water, and then leave them to dry.
2. Paint the Snake Green
- Shake the bottle of Knarloc Green paint, then open it carefully.
- Dip your brush in your rinsing water and brush it gently on the paper towel to remove the excess water.
- Dip the tip of your brush into the paint. It’s often easier to work from the pool of paint in the lid. Paint the whole snake green, paying particular attention to where it meets the rock (but try to avoid painting the rock if you can).
- This month, more than normal, it’s important to make sure the paint isn’t too thick. After the paint is applied you should still be able to see the texture of the scales (see the circled bit in the picture). If the paint is too thick, that detail will be lost, so you’ll need to put some paint out on a palette, and mix in a little water. This paint covers easily and well even when thinned.
- Once they are all painted, leave them to dry (10-15 minutes, depending on the weather).
3. Wash with Thraka Green
- Shake the bottle of wash, then open it carefully.
- Dip your brush in the rinsing water and brush it gently on the paper towel to remove excess water.
- Dip your brush into the wash and apply it liberally over the snake. It should flow off reasonably easily and fall off the high points, into the creases, bringing out all the details. (See the scales in the picture). Pay particular attention that the wash is in the right places on the head (so the details show up properly).
- Keep getting wash and putting it on the mini until it is reasonably covered. If it pools anywhere it shouldn’t, use the brush to move it to other spots. Try to keep it off the rock (if possible).
- After you’ve done each mini, it’s a good idea to rinse out your brush.
- Leave the minis for 20-60 minutes to dry (exact time will depend on the weather).
4. (Optional) Paint the Eye
- If you are an experienced painter, put a tiny dot of paint in each eye. Yellow or gold would probably work best.
- Only do this if you are confident you can … the wash gives enough contrast that it looks fine without, I just wanted to give the option if people wanted to do it.
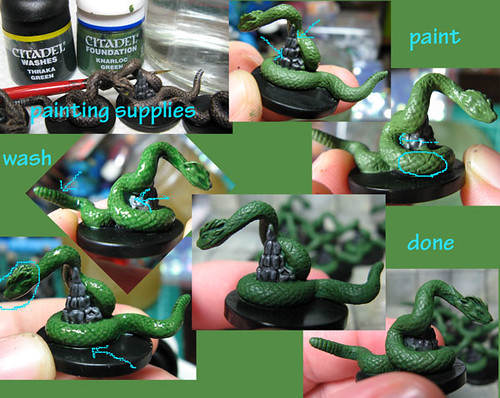
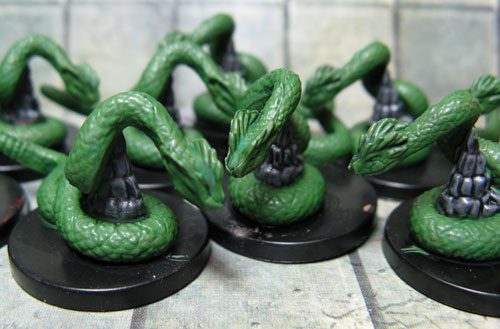
Use your Guild Logo Stamp on the bottoms of the bases, and then you are … finished! Please tell us about your Guild Repaints. Post a picture in Crafter’s Corner on Hordelings and tell us how many you’ve painted and given away. See you next month!
Comments
20 August 2013
10 years 19 weeks
17 June 2014
9 years 43 weeks