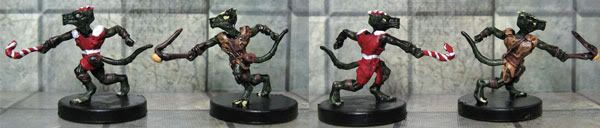
December 2010 repaint: Kobold Slinger
I, Megan Smith, Chapter Master in Brisbane, Australia, really liked getting Organized Play repaints. So much that I’ve taken it upon myself to bring DDM Guild Repaints back to life. This is number seventeen, a Christmas Kobold Slinger from Lords of Madness.
This one is a bit more work than normal, and includes a little modification of the mini, but the end result is worth it.
Paint needed: Mechrite Red foundation paint, Baal Red Wash, Skull White (from Citadel/Games Workshop)
Normal Painting supplies: paintbrush, water for rinsing the brush, paper towel.
Additional Tool: craft knife (or good scissors).
Steps
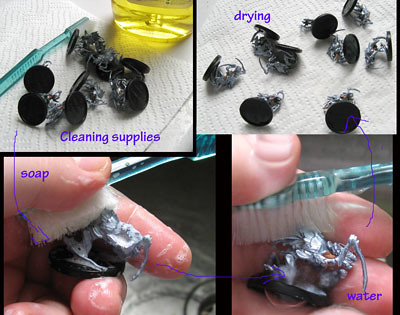
1. Clean your minis
Wash your hands first, then scrub each D&D Miniature with a toothbrush, using warm water and dishwashing liquid. Then, scrub again with just the warm water to make sure there’s no oil, soap, or anything weird on the surface of the mini. Throw them onto a paper towel a couple of times to knock off most of the water, and then leave them to dry.
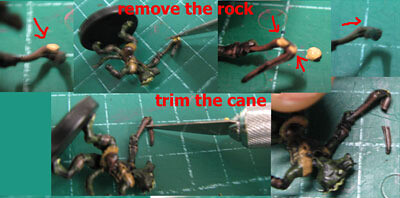
2. Trim the sling into a candy cane
- First, a few words about the use of a craft knife …. It’s always easier and safer to put your mini flat on a cutting mat (or a sheet of cardboard), and cut directly down into the mat. You have more control over the pressure, and there’s no risk of cutting something you don’t mean too. The plastic used for DDM is nice and soft, so it’s easy to do. If you don’t have a knife, you’d probably be able to do the trimming we need with a good pair of scissors.
- The first step is to cut off the rock. I did it in 2 cuts, one vertically down where you can see the knife in the photo, (which left 2 little lumps still left). Then I repositioned the mini, and cut them off with another vertical cut. (You can see the end result in the last picture on the top line.)
- Then trim off the free end of the sling to give right shape (use the pictures for a guide).
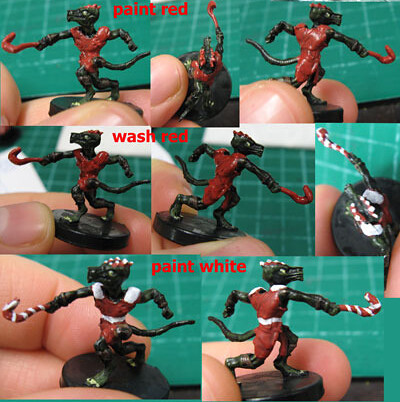
3. Paint the clothes, cane and crests with red
- Shake the bottle of Mechrite Red, then open it carefully.
- Dip your brush in the rinsing water and brush it gently on the paper towel to remove excess water.
- Dip the tip of your brush into the paint. (It’s often easier to work from the pool of paint in the lid). Cover the clothes (I didn’t paint the pouch, but you could if you wanted too). Then paint the cane, and the crests (try not paint the head, if needed, just do the top parts of the crests).
- Get more paint on your brush as needed, rinsing the brush between minis. If your paint is too thick and gluey, it might be easier to put some out on a palette and mix in some water to thin it a little.
- Once they are all painted, leave them to dry (10-15 minutes, depending on the weather).
4. Wash the red with Baal Red
- Shake the bottle of Baal Red wash, then open it carefully.
- Dip your brush in your rinsing water and brush it gently on the paper towel to remove the excess water.
- Dip your brush into the wash and apply it liberally over all the red. It should flow off reasonably easily and fall off the high points, into the creases, bringing out all the details. Make sure you don’t miss any, cause it will really show up. The skin is dark enough that it shouldn’t be visible if some slips, so don’t worry too much.
- Keep getting wash and putting it on the mini until it is reasonably covered. If it pools anywhere it shouldn’t, use the brush to move it to other spots.
- After you’ve done each mini, it’s a good idea to rinse out your brush.
- Leave the minis for 20-60 minutes to dry (exact time will depend on the weather).
5. Paint the white details
- Shake the bottle of Skull White, then open it carefully.
- Dip your brush in the rinsing water and brush it gently on the paper towel to remove excess water.
- Dip the tip of your brush into the paint. (It’s often easier to work from the pool of paint in the lid). Paint the shoulder pads, the belt (there’s a dip in the sculpt), and the very tips of the crest.
- For the stripe on the cane, get paint on the brush, then brush it on something (the edge of the paint bottle would do) to get a good point, then draw the stripe in sections (I found it easier to work from the hand out to the point). If you haven’t tried to paint details before, you might find it easier to practice on a piece of paper or cardboard, or plastic first. If you make a horrible mistake, you might be able to wash it off if you are really quick, but going back over the cane with red and then trying again for the stripe shouldn’t take too long.
- Get more paint on your brush as needed, rinsing the brush between minis. If your paint is too thick and gluey, it might be easier to put some out on a palette and mix in some water to thin it a little.
- Once they are all painted, leave them to dry (10-15 minutes, depending on the weather).
Use your Guild Logo Stamp on the bottoms of the bases, and then you are … finished! Please tell us about your Guild Repaints. Post a picture in Crafter’s Corner on Hordelings and tell us how many you’ve painted and given away. See you next month!
More about the background of the monthly repaints and the other repaints? You can find them all in the DDM Guild Monthly repaint introduction article.
Comments
18 November 2013
10 years 18 weeks
18 November 2013
10 years 18 weeks
19 April 2014
9 years 52 weeks
29 May 2014
9 years 45 weeks