DDM Guild logo stamp
Each month Megan Smith provides us with another great how-to article for her monthly DDM Guild Repaints. As an added enhancement for the repaints, the DDM Guild is offering Guild Logo Stamps to any interested DDM Guild Chapter Masters (contact us for more details). The Guild Logo Stamp adds that final, distinctive touch to a repaint that let's everyone know it is, indeed, something special.
How to Make a Guild Logo Stamp
Megan Smith writes:
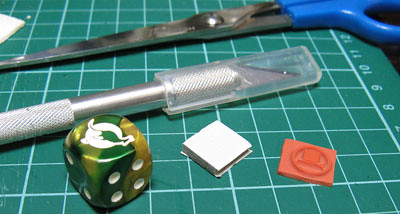
Supplies needed: unmounted rubber stamp and mounting foam (Chapter Masters may request these from the Chapter Lead and distribute to the appropriate local artist), scissors, craft knife, spare d6 (I'm using one of my GenConOz ones).
We've chosen to use a d6, because it's the right size, easily available, and easy to handle, but if you'd like to use a block of wood (or something similar), that also will work.
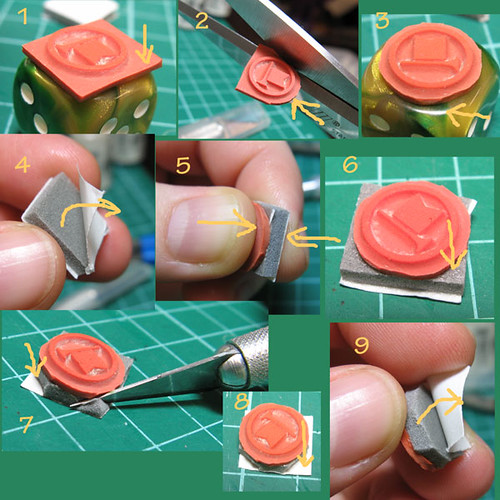
- Check the size of your dice, and stamp image... probably the stamp will hang over at the corners.
- Use your Scissors (or a craft knife) to trim off the extra rubber around the image (leaving a bit of a border).
- Check that it now fits completely on the flat surface of the dice. (If it doesn't, you need to get a bigger dice)
- Peal one of the backing papers off the foam square.
- Carefully place the stamp on the foam (not the image side
 ), and then press together.
- Notice that there's now grey foam corners sticking out from under the stamp.
- Cut off the foam corners (and any of the sides if they need it). It's better to use a knife for this, cause if you use scissors, they will get glued together. If you don't have a cutting mat, a couple of pieces of cardboard (like from the side of a minis booster) will work to protect your table.
- Check that you got most of it, though it doesn't need to be perfect.
- Peal the backing paper off the foam, and put it carefully onto the dice (pressing strongly once it's in position). It's probably a good idea to do something I didn't, and try and get it so the image is straight, cause it will make it much easier to position later.
- Finished!
How to Use the Guild Logo Stamp
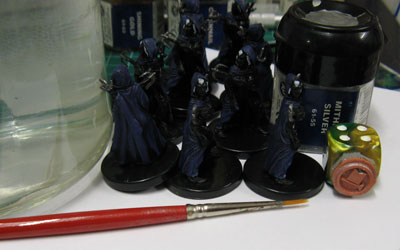
Supplies needed: Guild Logo Stamp, Mithral Silver Citadel Paint (from Games Workshop), minis to stamp, paint brush, large jar of water, spare card sleeve or other non-porous, flat surface (not pictured)
A word of warning: it takes a little practice to get a consistent result. I'd suggest practicing stamping on something like a booster box before you add in the extra complications of unevenness on the base of the mini.
- Shake your paint, then open it carefully.
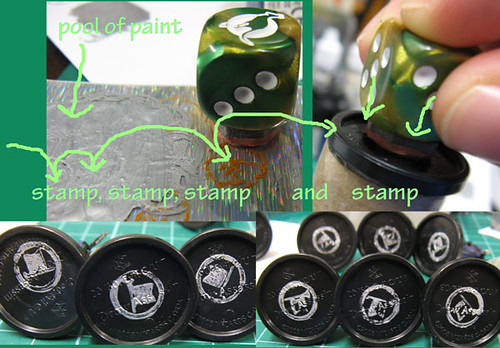
- Use your paint brush to paint an area of your card sleeve. There needs to be a noticable layer of paint, but it can't be too thick.
- You need to move reasonably quickly for this next bit. Put your stamp on the pool of paint, and press down a little, then do it again in a different place in the pool.
- Stamp on the card sleeve, beside the pool, to remove some of the paint and help even it out, then.
- Place the stamp on the base of your mini (try to avoid stamping in the centre, and inline with the writing, because either of those will leave you with big gaps in the image), with very slight pressure, rock it backwards and forwards, and side to side (to make sure that you get a good amount of contact around the words. Be very careful the stamp doesn't move as you do this.
When you are finished, use your paintbrush to wash the stamp with water (and possibly a gentle fingernail to scratch off any big chunks of dry paint).
How to fix it if it goes wrong:

Don't worry too much if it's not perfect (see the examples of the ones I made). If it's really terrible, as long as you move quickly, you can use your paintbrush and water to clean it off (just make sure the base is totally dry before you try again). You can do this about 3 times, before the slight buildup of metallic flakes on the bottom gets to be too much.
Feel free to post questions and show off your results in Crafter's Corner on Hordelings!
Comments
19 November 2013
10 years 20 weeks